

I love going to events for the simple reason that I get to surround myself with like-minded people.
It allows us to connect on a human level, not a digital one.
Although I love listening to stories, I am most of the times not such a big fan of the speakers for the simple reason that it’s mostly always the same story.
If you are lucky, they are recording the talks which allows you to watch it while deciding on watching Netflix or not.
I am a big believer that the stars of the event aren’t on stage.
That’s right.
The stars of the event are the like-minded people that made a choice (yes, I didn’t use that word accidentally) to be at the event and therefore open to improve their way of thinking.
As Malcolm X puts it:
“Education is the passport to the future, for tomorrow belongs those who prepare for it today”
The problem?
For most of us that aren’t naturally greeting everybody around the corner, we end up spending time drinking our coffee at a lonely table while watching other people talk.
That stories end today.
Today, you’ll learn how to connect with people before events, reach out and meet them on the event itself.
No more standing at mister/misses lonely table for you.
Ready?
Of course you are.
Oh, did I say we are going to automate most of the work?
Requirements:
- Access to a list of attendees that are online somewhere.
- Common sense.
- Budget: 0 euro.
Process:
Step 1: Getting the attendee list of the event in a Google Sheet.
Your Attendee list is send to you or you ask for it.
Your attendee list doesn’t list the names
Your Attendee list is on a website
You don’t receive an attendee list but the event has a FB event.
Any other scenarios?
Step 2: Format your data
Step 3: Filter out the most relevant people to meet on your event by enriching your data.
Step 4: Find people’s email to use in a sequence
Step 5: Send automated messages to your segmented audience.
Step 6: Get people to commit to your meeting.
Step 1: Getting the attendee list of the event in a Google Sheet.
Before you can get the most of your event, you kind of need to know who is attending.
This is mostly the hardest part since some of the event organizers are aware of the lurky marketeers like myself.
Which is great since it helps us stay on top of our game.
Our ultimate goal in order to proceed to step 2 is having a list of the following in a google sheet:
- First Name
- Laste Name
- Company name (optional but will increase the results dramatically)
Here are some of the possible situation you might find yourself:
Your Attendee list is send to you or you ask for it.
It still happens that most of the event organizers want you to connect with the people joining the event.
Since I guess that’s pretty much the point of an event: connecting and inspiring with relevant people.
If you receive the list in a Google Docs or PDF, just copy it to a google Sheets and you are done.
Don’t worry about the structure of the names and companies. We are going to take care of that later in this guide.
If the list isn’t send to you, it’s always worth a shot to ask for the attendee list. 🙂
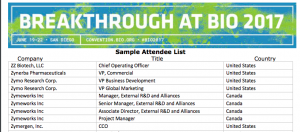
Your attendee list doesn’t list the names
Most of the time, the list isn’t just given to you because they want you to buy the ticket in order to meet these ‘famous people’ just as in the example below:
This one is a little bit more tricky, but since you have this guide it’s a going to be a piece of cake.
We are going to automate Linkedin searches on the terms you have in your Sheet in order to find these people.
Before setting up your robot you’ll need to have a column with the ‘company + Title’ like this:
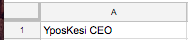
If you have them in different columns you can use a little trick in step 2 to merge them together
Create a new tab and copy paste all the terms into the first column..
Once you have a spreadsheet with one column on your first tab as the image above, it’s time to set up your robot.
We are going to use a little Robot called Phantombuster to automate this process for us.
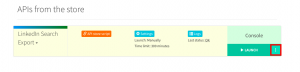
Step 1: set up the robot
Let’s head over to our little robot and click on the orange button right here.
If you haven’t made an account yet, this is about the time to do so.
If everything went right this is the screen you’ll see:
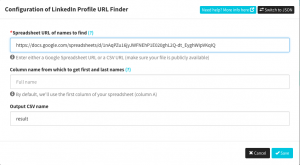
Click on the 3 green dots to tell the robot what to do, this screen should pop up which we will tackle one by one:
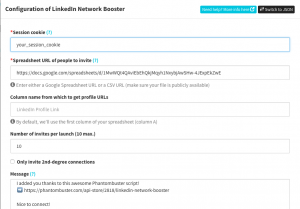
Linkedin session cookie:
As for your session cookie, don’t worry if you have no clue what this is. Because the script will manipulate LinkedIn for you, it needs to be logging on your LinkedIn account.
- Using Chrome, go to your LinkedIn homepage
- → Right click anywhere on the page and select “Inspect”
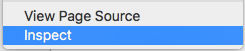
- Locate the “Application” tab, this might be hiding these 2 arrows ‘>>’.

- Select “Cookies” > “http://www.linkedin.com” on the left menu.

- Search for “li_at”

Copy the long code next to li_at as shown above (Double click on it then Ctrl+C) and paste it next to your ‘Session Cookie’
Google Spreadsheet URL:
Before copy-pasting the URL on the second line You’ll need to fix a common mistake. Changing the settings of your Google Sheet to.
- Head over to your Google Sheet and click the blue button ‘sharing’
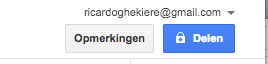
- Click ‘advanced’
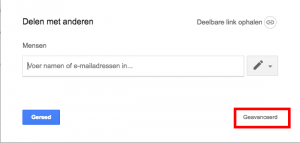
- Click Changes or in my case ‘Wijzigen’. Don’t even try to pronounce that if you aren’t a Dutch speaker. 🙂
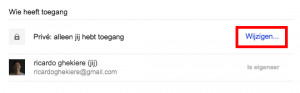
- Click ‘Everybody with this link’
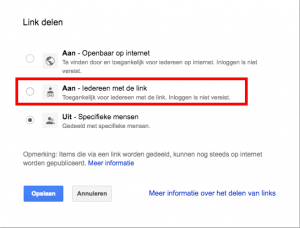
- All set now! You’ll now see the link that you are able to copy-paste in Phantombuster.
Search degree
Make sure to switch on the 1st connections, you never know if you already know him or her
Whaaauw, that was long. I know but you’ll start saving some serious time in right about now.
It’s time to save and let the robot do all the work for you.
Time to launch by clicking… ‘Launch’. (pretty obvious)
Step 2: Import data in Google Sheet
Once the bot has stopped running, you can scroll down and download your data as in the image below:
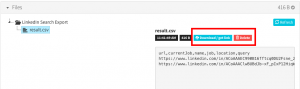
Now, the file will come in a csv file which is not very useful right now. Don’t worry. I’ll help you import it to your Google Sheet.
Go back to your Google sheet and press File → Import → upload → upload your downloaded file → create new sheet.
Your data should look a little bit like this now:

Since you now have a list of possible people that are going to the event, you can skip step 2 and 3 and head over to step 4: Segmenting your audience.
Your Attendee list is on a website
This one is a little harder since it depends on the website structure. Hit me up in the chat and I’ll teach you how.
You don’t receive an attendee list but the event has a FB event.
(work in progress)
Any other scenarios?
Hit me up in the chat and I’ll figure it out for this guide.
Step 2: Format your data
Great job collecting all that valuable data. You are one step closer to not being the lonely coffee drinker as I used to be.
Now it’s time to set your data straight in order to find people their Linkedin URL and start connecting before the event.
As said in step 1, you’ll need the data formatted like this:

1 column with the name of the attendee and preferably the name of the company.
Why?
In the next step you will automate a little robot that is going to search the web for all these names and give you back their Linkedin URL. The more information you have about the person, the higher your chances receiving the right data.
Most probably you’ll have your data in different columns so far.
Here is how to bring it all together.
Let’s say you have 3 different columns and want to bring it all together in the 4th one.

Step 1:
Go to the D column and paste the following code inside
=concatenate(A1;” “;B1;” “;C1)
Tip: in case you only have 2 columns (name + company) you can use this code:
=concatenate(A1;” “; B1😉
You’ll see that the first, second and last column are now sitting together like this:

Step 2:
Click on the D column as in the image below to select to full column

Press CMD + D (MAC) or Control + D (windows) and watch the magic happen.

Step 3:
Now it’s time to create a new tab and drag it to the first row. Name it: “These awesome scraped names”. It’s important that this tab comes before your scraped data!

Step 4:
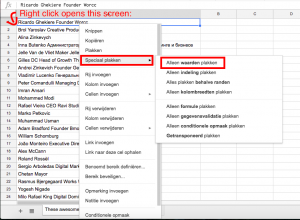
Time to copy the whole column (G) in your new tab. Make sure to copy it with the values! Here is a great picture that shows you how. 🙂
- Create a new row, just above your first name (in this case Ricardo Ghekiere), and give it a name: “Names” → important step
- Done! Great job Picasso/Picassa.
Step 3: Find People their Linkedin URL to connect at scale
Now it’s time to find these people their Linkedin URL. To do this, we’ll use a handy tool called Phantombuster to automate this for us. It’s a freemium little robot that automates the monkey tasks we are still doing today. In this case, finding Linkedin URL’s. Let’s get started.
- As you may know or not know. I am a cheap ass. So before using the next API, go back to your dashboard ‘My API’s’ and delete your first robot. This will allow you to use the second robot for free too. 🙂

- Click here to start using Phantombuster and press ‘Use this API’ (the orange looking button, Sherlock)
- You’ll see the following screen.
It’s time to hit those 3 green dots as shown in the example above. This screen should pop-up:
All it’s asking, are 2 things:
- The URL of the spreadsheet with all those attendee names and companies and;
- The name of the column those names are in. If you have followed my steps above, this should be “Names”
- Before copy-pasting the URL between the first brackets “ …”. You’ll need to fix a common mistake. Changing the settings of your Google Sheet to. (if you have done this before you can skip this)
- Head over to your Google Sheet and click the blue button ‘sharing’
- Click ‘advanced
- Click Changes or in my case ‘Wijzigen’. Don’t even try to pronounce that if you aren’t a Dutch speaker. 🙂
- Click ‘Everybody with this link’
- All set now! You’ll now see the link that you are able to copy-paste in Phantombuster.
- As a final step, you’ll have to add the name of the column your Attendee names are in. If you followed the steps above exactly, this should be: “Names” (watch the capital letter).

- Save the settings and it’s now time to launch the beast by clicking ‘Launch’. Time to high-five yourself again.
- Once the little robot has finished you’ll be able to download the list as a CSV file. If you open it, you’ll notice the chaos already. It’s time to structure this in a way humans can read.

- Go back to your Google sheet and press File → Import → upload → upload your downloaded file → create new sheet. BOOM, you now have a great list of targeted Linkedin URL’s.
- Before reaching out, you’ll see that some of the Linkedin URL’s weren’t found. No biggie. Before reaching out, let’s delete the ones that weren’t found.
- Click on your column with the name ‘ Linkedin Url’ → click on the filter icon on the top right bar → click on the text Linkedin Url → delete → search for: “none” → press ‘ok’ → delete all rows. → click on the text Linkedin Url → Select everything → press ‘ok’.

- You now have a proper list of Linkedin URL’s from your FB Group. It’s almost time to say hello.
Step 4: Filter out the most relevant people to meet on your event by enriching your data.
Now you have all those Linkedin URL’s, but we still have no clue if they are of any value for you in the near future.
In order to filter out the most relevant people to connect with, we need more data about them. Luckily, people are willing to give this information for free online.
It’s time to enrich our data of the profiles and see who’s relevant and who isn’t.
- We are going to use our little robot (Phantombuster) again to find more information about our Linkedin URL’s. First off, let’s install our little robot right here and click on ‘Use this API’ (delete the old one to have a free version again).
- Same as in step 2 and 3, go ahead and click on the 3 dots to tell you robot what to do.

When your next screens open you’ll notice that he’ll be asking you for 2 things: your Linkedin session cookie and spreadsheet URL with all the Linkedin links.
The second one is easy-peasy (make sure to always have the list in the first tab!), go ahead and fill that one in.

As for your session cookie, don’t worry if you have no clue what this is. Because the script will manipulate LinkedIn for you, it needs to be logging on your LinkedIn account.
- Using Chrome, go to your LinkedIn homepage
- → Right click anywhere on the page and select “Inspect”
- Locate the “Application” tab, this might be hiding these 2 arrows ‘>>’.
- Select “Cookies” > “http://www.linkedin.com” on the left menu.
- Search for “li_at”
- Copy the long code next to li_at as shown above (Double click on it then Ctrl+C) and paste it next to your ‘Session Cookie’.
- Save everything and start running your little robot.
- Once it’s finished, import the data in your Google sheet (if you forgot how, have a look back at step 2 or 3).
- You’ll now see a beautiful list of people with data from their profile. Segment as you wish to connect with them growth master.

Tip: You’ll notice that you’ll get some emails from the scraping. I beg you, do not start out sending random emails to your (almost) connections unless it’s hyper targeted and really relevant to that person (like meeting him on the event your are going. 🙂 )
Don’t say I didn’t warn you.
Step 5: Find people’s email to use in a sequence
Finding emails isn’t actually the hardest thing to do since you have some amazing software tools to do this for you.
All you need is:
- First Name
- Last Name
- Company names
And guess what?
It looks like you have gathered all those details already.
There are 2 ways I would suggest on getting these emails from your prospects:
Anylead allows you to get as many emails as you want for a monthly pricing of 99 dollar, which is great if you have a huge database to run.
Most of the time, the list is limited for the events you are heading to.
This is why Find that lead is an affordable way to get your emails verified. It allows you to get 1500 verified emails for a humble price of 29$.
What I tend to do when this is quota is exceeded, is to segment a little further on the leads I would really like to meet, since there is no way you can meet all those people on your own, unless your name is Salesforce.
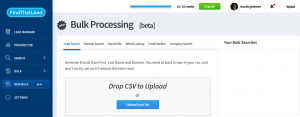
To find your emails, head to your FTL dashboard and click on ‘new bulk’. It’s currently in Beta so make sure to double check everything just in case.
Step 6: Send automated messages to your segmented audience.
Alright, time for our last step. The step you might have been waiting for. It’s time to connect with all those segmented people in your own unique way.
- We are going to use our little robot (Phantombuster) again to do this monkey job for us. First off, let’s iset up our little robot right here and click on ‘Use this API’.
- Same as in step 1, go ahead and click on the 3 dots to tell you robot what to do. You’ll notice that the robot is asking your Linkedin session Cookie again. Easy-peasy, go ahead and fill those in (if you forgot, head over to the step above). No need to look at the 3th and 4th option.
- Now let’s head over to your Google Sheet with all the data of the Linkedin Members. Always make sure that the tab with the Linkedin Urls are in the first column and on the first tab!
- The little robot will ask you again to give the name of the name of the column. Create a new row above all your Linkedin Urls and give it the name: ‘Names’. Input the same (with capital) in your little robot.
- Now it’s time to craft a compelling message to all those awesome people, click save and launch your little robot.
Now you might be asking, what the heck am I going to write them? Great question. Let me help you out.
Linkedin is about building connections with people you would never had the chance to meet in a non-digital age. People whom all have their different interesting stories and challenges to solve.
Now the beautiful part is, people love to talk about themselves and we love it when people listen to us doing so. This is exactly what we will be asking them.
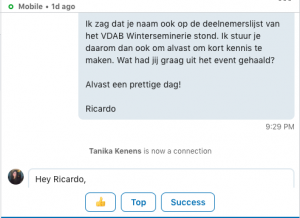
Example:
Hey #Firstname#,
I noticed your name on the attendee list of of (event name).
This is the reason why I wanted to reach out already and get to know you.
What would you like to get out of it?
(your name)
(Don’t worry if you can read this, about 99% of the world can’t).
Pro tip: Explaining the reason why you want to connect is one of the key factors of getting a reply back. There is a whole psychology behind this which I will spare you for now. 🙂
Pro tip 2: Before sending out all those awesome people, optimize your profile to have a better acceptance rate (things like: ‘Meet me at (event name)’ usually works great.
Pro tip 3: Most people will accept your invite but won’t read or forget about the text your wrote. Make sure to follow up where needed.
It’s time to click the Launch button, sit back and relax.
Step 6: Get people to commit to your meeting.
I remember this one event where I was super excited to meet all these awesome people.
I didn’t really have an appointment with them but I figured out they would recognize me or send me during the event breaks.
Guess what?
Those things don’t happen because there was no real commitment.
The key to meeting relevant people is to make sure they book a meeting with you during the event (breaks).
My way to go at the moment is creating a Calendly account and have people book slots at times that work for you and them.

This let’s your invitees choose their preferred time and let’s you ask extra question such as ‘things you would like to talk about, contact details,…’.
Pro tip: Don’t ask to to book a meeting straight away, first talk as a human, not as a robot.
Enjoy your meetings for growth!
May 7, 2020